
I want to introduce you to my app, it’s called Show and Hide. It’s an image processing app. This is V1, so the UI is pretty simple, so I think it’s a reasonable example.
Briefly, what the app does is it detects the dominant color in an image, and creates these cool partially colored images based on that. Think of the postcards of London with the black and white scene and the red bus. Except it’s done algorithmically so the idea is you don’t actually need… you know… artistic talent.
I have a workshop, built around an example app but I here I’m talking about a real one. Because one of the things I find really useful is finding out what people really do, not what we might theoretically do in a constraint-free world, or where we can bend our spec to match what we are trying to demonstrate. This is what I really do.
Admittedly, I’m a bit of a unit testing obsessive… as you will see.
3 Principles
I want to start with some things that I think are true. If you find these assumptions wildly disagreeable it might be a good sign you’ll hate this post.
There is no One True Way of Writing Software
The first is that there is no One True Way of writing software. I really don’t have a lot of, well any, patience for arguments like “which is better Vim or Emacs?”. At a higher level than that, I think we work within the constraints we have, and we make the decisions that make sense to us at the time. Maybe the last developer wasn’t an idiot! Maybe they were just working with different information than we have today, or under different constraints.
You Are Not Your Code
The second is that you are not your code. We use that as a reason not to get attached to our code, to be OK if it gets deleted. I think it also works the other way – we all write stupid code sometimes, it doesn’t mean that we are stupid.
Any Test is Better Than No Test
The final thing is that any test is better than no test. This might be the most contentious. I’ve been on code reviews where someone critiques a test because it’s not done some “better” way, which incidentally would require a significant refactoring. I take the approach, write a test. Even a bad test, because at least you will have a test. Then you can improve it, and your code. This is mostly about avoiding analysis paralysis – instead of agonizing over perfection, I advocate for writing some kind of test, and going from there.
3 Apps
Who actually writes unit tests for their iOS apps? Anyone shipped an app without any?
Guess what kind of coverage the first iOS app I worked on had? I’ll give you a clue. I used to work for Google.
OK, that was more of a red herring. It had zero test coverage. We shipped without tests.
At the time, I was a junior developer, but I knew this was wrong. And I asked the guy running the project, the tech lead, if this wasn’t a problem? Shouldn’t we like… have unit tests?
And he said, “we’re moving too fast to write tests.”
His answer was not compelling to me, but I wasn’t really in a position to argue.
Then, in the way of all badly executed projects in remote offices, this project was taken to the US. And I moved to work on something else.
This new app did have tests. Some tests. Not many. We talked about “designing for testability” and “dependency injection” and all this kind of stuff… but we didn’t actually write that many tests.
And again, in the fullness of time, this project was also taken to the US. So I moved to Australia, and now I was the tech lead, I had two engineers, a clear mandate, a 3-month deadline, and it was great.
Have you noticed how often in this industry we learn what not to do? It doesn’t always teach us that much about what we should do. Anyway, I had learned that it was a Bad Idea to ship an app without unit tests. So we had a test target. We also had this deadline that was pretty tight.
We were about 2 months into the project. I had finally started to believe that yes, we might actually be able to send the app to the app store in another month.
My manager calls me into a meeting and tells me his manager isn’t happy with our test coverage. My mind is blown. I mean, I had worked on an app without any tests at all and nobody seemed to worry about that. And we’re doing pretty well for an iOS app, I thought. We have a test target, our model code is tested, we’re about to add some UI-automation tests. What more does he expect?
Background
I’ll finish that story later, for now let’s start looking at how we can do better than that.
Just a bit of background, that I want everyone to be happy with. These are some testing concepts that occur throughout and it’s important you are happy with them. I’ll mention what libraries I use, and alternatives.
What is a Mock?
Firstly mocks. Mocks are objects we create in tests that we can use to simulate the behavior of a real object. We can give set responses for events, and record all interactions with the mock.
There are “nice” mocks, and “strict” mocks. Nice mocks are – you guessed it – nicer. Strict mocks have to have every interaction defined otherwise they will cause the test to fail.
There are a number of mocking frameworks available. I’m using OCMock but you could also look at OCMockito.
It’s worth mentioning here when we use mocks and why. So we can use mocks to verify interactions – to say, this event triggers this interaction, and we can use them to create state.
For example, an image app, includes the option to take pictures. But, only on the device, as the simulator doesn’t have a camera. So we need some way to create the “state” of having a camera, and the way we do that is by using a mock.
This is why we don’t mock data structures. You use an NSArray instead of a mock NSArray because a mock NSArray is a bad idea. Mocking the state of the array is so much harder than just… using a real array.
If you think about inductive proofs, if you’ve ever done that kind of thing, it’s just math really, there are some things that you accept as true. Like, 1 + 1 is 2. And if we think of tests as verification of what our program does, there are some things we accept as working, and data structures are that.
Tests that verify interaction are more tightly coupled to the inner workings of your code. Sometimes this is what you expect, it’s just something to be aware of.
UIAutomation Testing
UIAutomation tests are also known as monkey tests – something that will go through and tap buttons on your app and make things happen. These are properly “black box” tests – all they know about is the UI, not the inner workings of your code.
Personally, I use KIF which wraps Apple’s UIAutomation so we can write tests in Objective-C, but there are other alternatives.
Confidence vs Coverage
The other thing that it is worth mentioning here is measuring coverage. I use CoverStory, there are other options like Frankencover or XCover.
Code coverage tells us what percentage of our code is covered, and we can use it to identify areas with poor coverage so we can improve them.
Coverage just means the lines have been executed. It doesn’t mean that they have executed properly. You can write one enormous test that exercises every line of code in your app, but it might not tell you much more than “it compiles”.
Confidence is about knowing how things work, having different inputs covered. Confidence allows me to develop against my tests.
Creating a Seam
The Trouble with View Controllers
The big reason why iOS is not that testable is that the ViewController mixes control code and view code. If we want to write tests, we don’t really want these two things entwined together – we want a “seam” between them – a seam is what we use to isolate something and test it.
Introducing the Presenter
The name presenter comes from the “MVP” or “Model – View – Presenter” pattern, but it doesn’t really matter, the point is we split out the “control” code from the ViewController, and leave the ViewController only handling the view. So what might we split out?
- Delegates.
- Selectors put on targets (like buttons).
- Network calls.
- Interfacing with the model.
So each ViewController now has a corresponding Presenter. Because of memory management, the Presenter needs to keep a weak reference to the ViewController and the ViewController a strong reference to the Presenter. A top level class allows us to abstract away code common to all such pairings.
Things in the top level class:
- A call to [presenter viewLoaded] in [viewController viewDidLoad
- [viewController pushNavigationController].
The best possible level of separation in this model is:
- The ViewController knows there is a Presenter.
- The MyScreenViewController knows there is a Presenter.
- The MyScreenPresenter knows it is related to a MyScreenViewController.
This is similar to the Reactive Cocoa MVVM pattern, but you don’t have to go full Reactive Cocoa in order to make it work. There’s little enough code here that I will happily recreate it in each project, so each time only what I need are included [more detail here].
Testing Show & Hide
Now that we’ve covered these concepts, let’s look at how we can use them to unit test the UI code of a real app. For each screen, I’ve highlighted two things we might want to test but require a bit of thought.
Home Screen
 Let’s start with the home screen. We just have three buttons (two if there is no camera available) and in the cut down V1 feature set our actions are that we’re launching either the photo picker provided by the OS, or a ViewController just containing UIWebView with our “inspiration”.
Verifying Button Click
So we want to test that the right thing happens when the buttons are clicked.
There’s three phases of testing buttons on iOS. The first is that we don’t do it. The second is that we expose the method that should be called when the button is pressed, and we test that. The third is that we programmatically tap the button.
Option 1: testSelector
- We add a selector “xButtonPressed” to the x button. So in this case, “galleryButtonPressed:” to “galleryButton”.
- We expose that method in the header file.
- We write a test that is “testXButtonPressed” that verifies that selector does what it should.
Seems reasonable, right? We will have decent coverage here. Two main problems:
- We have had to expose a method only for the purposes of testing. Not the worst thing, true, and Java has a @VisibleForTesting annotation because this is a common pattern. In iOS we can get around this by re-declaring it in our test in a category, but I like that even less.
- We haven’t verified that that action actually gets added to the button.
Option 2: sendTouches
- The selector gets added in the presenter, for me this is in the
[presenter viewLoaded]that gets called in[viewController viewDidLoad]. - We mock the HomeViewController and return a real UIButton when asked for the button we want to test.
- We call
[button sendActionsForControlEvents:UIControlEventTouchUpInside]; - We verify that what happens is what should when that button is pressed (e.g. the ImagePicker is launched).
Downside? Little bit more complicated.
Upside? Nothing is exposed, and we are verifying that when that button is tapped, the right thing happens.
Verifying VC Pushed On The Stack
The other thing we might want to verify here is that another ViewController gets pushed onto the stack. In the ViewController we do this by accessing the NavigationController property, in the UIViewController base class that all ViewControllers extend.
But if we consider pushing ViewControllers to be View code, and so it should live in the ViewController, how might we do that?
Partial Mocks
Partial mocks allow us to mock only part of an object. It’s great in cases like this, where we can use it to mock functions of the parent class (which we assume Apple has tested for us), and isolate our own code.
Mocking the Navigation Controller
So let’s say viewController_ is the instance of the thing we are testing, and we want to make sure that [navigationController dismissViewController:…] is called. That would look like this.
// Create the mock navigation controller.
id mockNavigationController =
OCMStrictClassMock([UINavigationController class]);
// Create a partial mock for the ViewController.
id mockViewController =
[OCMockObject partialMockForObject:viewController_];
// Stub to return mockNavigationController.
[[[mockViewController expect]
andReturn:mockNavigationController] navigationController];
// Set up expectations.
OCMExpect([mockNavigationController
dismissViewControllerAnimated:YES
completion:nil]);
// Call the method that should trigger them.
[viewController_ dismissViewControllerAnimated:YES
withCompletionBlock:nil];
// Verify!
OCMVerifyAll(mockNavigationController);
OCMVerifyAll(mockViewController);
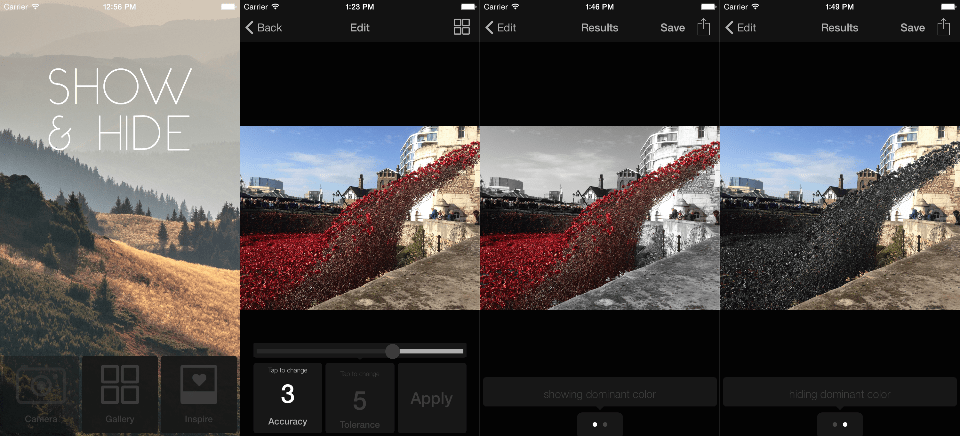
Image Editing Screen

Next up is our image editing screen. Here you can see that we have buttons on our navigation bar – a gallery button here, and also if there is a camera on the device a camera button.
Notice with the camera button, this is something that we can’t use UIAutomation for because the simulator doesn’t have a camera, but we can totally unit test.
Again we have three buttons at the bottom, but the Apply button here is a little more complicated than last time, and we’ll get to that.
Navigation Bar Buttons
We can take a similar approach to navigation bar buttons as we did to regular buttons. But there are a couple of differences.
Firstly, these get set in viewDidLoad, but we can separate them out by creating them in the Presenter. The top level Presenter class has properties leftNavigationButtons: and rightNagivationButtons:, so in my top level ViewController class viewDidLoad: looks as follows.
- (void)viewDidLoad {
[super viewDidLoad];
[[self navigationItem] setLeftBarButtonItems:[[self presenter] leftNavigationButtons]
animated:YES];
[[self navigationItem] setRightBarButtonItems:[[self presenter] rightNavigationButtons]
animated:YES];
[[self presenter] viewLoaded];
}
I create these buttons in the presenter because I want the target of the buttons to be in the presenter, but it doesn’t really matter – the point is that it is isolated.
Now we want to test that when the button is tapped it does what we want it to. We get it out of the array returned, and then we call “performSelector” on it.
// Extract the button.
UIBarButtonItem *button = (UIBarButtonItem *)
[[presenter_ leftNavigationButtons] firstObject];
// Perform the action.
[[button target] performSelector:[button action]
withObject:button];
Handling Asynchronous Code
The other testing challenge we have on this screen is the apply button. Why? Because to make the app feel faster the image gets pre-processed, and the apply button is only enabled when that pre-processing is done. The challenge arises because that pre-processing happens on the background thread.
- In the UI thread, load the view.
- Switch to background thread.
- In the background thread, process the image.
- Switch back to the UI thread.
- In the UI thread, enable the apply button.
This makes things easier because we don’t have to deal with handling the apply button being pressed before it is ready, but it does make our testing slightly harder.
XCTest has a mechanism for testing asynchronous code, it’s called the Expectation. It’s a little confusing to read about, but essentially:
- Create a thing (an “Expectation”).
- Include a timeout in your test that will allow it time to happen.
- Call “fulfil” on that expectation when your thing has happened.
So here we create an expectation:
XCTestExpectation *expectation =
[self expectationWithDescription:@"desc"];
And then we give it a wait (typically I put this before my asserts / verify):
[self waitForExpectationsWithTimeout:1 handler:nil];
If we run the test now, it will fail. Because the expectation is never fulfilled. Fulfilling is so easy, we just call:
[expectation fulfill];
But where do we put it? In this case, we want to wait for the apply button to be enabled and fulfill it then. If we are using a mock, we can use andDo, so;
OCMExpect([mockApplyButton_ setEnabled:YES]).andDo(^(NSInvocation *invocation){
  [expectation fulfill];
});
So it’s important to be clear here – the wait goes at the end of the test. Fulfilling it goes somwhere inside the test. If you use andDo, it’s at the last thing that will be called at the end.
One of the super fun things about asynchronous testing is that if you get your test wrong, it’s often another test that will fail. This is how to make debugging extra exciting.
Processed Image Screen
The last screen of the app. We have a carousel of two images the user can swipe between.
Swipe Gestures
This is actually a test I didn’t write. Don’t get me wrong – I tried. But I couldn’t figure out how to programmatically simulate a swipe gesture and opted to test this using KIF.
I’m including this because much as I think you can unit test almost everything, it’s almost everything and not everything. Some parts of the UI are better covered by UIAutomation – and I decided this was one of them.
Breaking into UIImage
Now this is the last example so let’s go even deeper.
Show and Hide is an image processing app. Which means it takes an image and does stuff to it – and that was part of the app that I really wanted to be able to develop against my tests. Firstly because it’s by far the most complicated part and I really wanted to understand what was going on. And secondly because I rewrote this part of the app several times before I could get it fast enough. My tests were invaluable here.
Who has written tests involving images? Who did it by including test images in the resources?
That probably works fine for a lot of things, but for me what I wanted was images with certain properties that I could say what they should be like at the end of this process. To give you a sense of that – this part of the app (about 300loc) has 22 tests and approximately 400 lines of test code, plus performance tests (which I put in a separate target because the get run 10x each and make my test target too slow).
But that’s cool, we’re programmers right? We make things. Including UIImages. And we break things. Including UIImages.
So in addition to my test code, I have test helper functions that:
- Simpler but slow – draw the image into context:
- Make an image with one color with a certain size.
- Make an image with multiple colors. a 2×2 4 color image, and a 3×3 2 color image.
- Harder but faster and more flexible, creating a context, filling an array with RGBA data, and calling CGBitmapContextCreateImage():
- Make an image with a given width and height from an array of UIColors.
- Break an image down into a list of UIColors (similar to the above).
- Compare two UIColors and see if they are the same (if the r, g, b, and a values all match).
This means that I can:
- Create images with certain properties (matching the tests I want to run).
- Compare the resulting images – beyond size. Remember we want confidence not just coverage. If two images have the same size, and break down to arrays of equal UIColors, I can consider them to be equal.
- Create enormous images for performance tests.
I’m not including code here because it’s quite long but it’s open sourced and on GitHub.
What About KIF?
KIF is great. I also have KIF tests, I see these strategies as entirely complementary.
KIF tests:
- Are slower to run.
- Are hard to test corner cases on.
KIF tests are great for:
- Making sure your app is accessible throughout.
- A sanity check that each view loads.
- Testing things like carousels.
The End
These are some of the most interesting testing challenges that I encountered building Show and Hide and aiming for 90%+ test coverage. I’ve delved into some of them more in this workshop.
That day when I was told we had to get our test coverage up to ship, I discovered how little I knew about testing, and how the standards in the projects I had previously worked on were just not good enough, in general, but especially compared with the way we write tests on the server side.
It was an opportunity for me to go and start figuring out how to do these things, because as I’ve covered here, whilst sometimes it requires a bit of thought, and isn’t done often, it’s almost always possible.
And now, I have the answer that I didn’t when I was a junior dev – when the guy said “we’re moving too fast to write unit tests”. Today what I would respond is how long do you want to move fast for?
Yeah, it’s usually faster to ship today’s code without tests, but it’s not technical debt – it’s an unhedged call option – and some day soon it’s liable to come due.
Testing is an investment, it does take time. If you can develop against your tests though, you can start to get it back because it is so much faster. If you can be confident shipping a build in 30 minutes rather than in 4 hours then you’ll see a difference. I haven’t mentioned performance tests here, which are worth looking into in order to monitor the performance of your app over time.
The biggest difference are those that are hardest to quantify – the bug found early, that didn’t make it into production. But I think the biggest benefit is the structure and understanding that you get in and of your code when you default to trying to unit test everything.
If you found this interesting, I’ve covered some of these strategies in more detail in this workshop – there’s a sample app and a guide that takes you step by step through adding tests.
5 replies on “Unit Testing on iOS: Beyond the Model”
[…] you are interested in the content, you can find my blog post from my speaker notes here, and an updated version of the workshop for working through at home is available for […]
[WORDPRESS HASHCASH] The comment’s server IP (69.163.242.185) doesn’t match the comment’s URL host IP (69.163.242.203) and so is spam.
Thanks for writing this, I learned a lot.
For the choice between OCMock and OCMockito, it’s worth noting that OCMockito doesn’t support partial mocks: https://github.com/jonreid/OCMockito/issues/38
[WORDPRESS HASHCASH] The poster sent us ‘0 which is not a hashcash value.
Ooh good to know! I didn’t know I would need them when I made that decision but find them SO USEFUL!
[WORDPRESS HASHCASH] The poster sent us ‘0 which is not a hashcash value.
[…] been giving this talk about unit testing UI code lately and of course when you talk about testing, TDD (test driven development) keeps coming […]
[WORDPRESS HASHCASH] The comment’s server IP (69.163.242.185) doesn’t match the comment’s URL host IP (69.163.242.203) and so is spam.
[…] a more technical talk (unit testing […]
[WORDPRESS HASHCASH] The comment’s server IP (69.163.242.185) doesn’t match the comment’s URL host IP (69.163.242.203) and so is spam.